Saturday, 22 March 2014

Chanel cookies


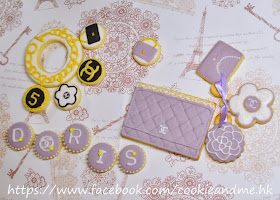
One of my close friend's birthday is approaching, I am taking this opportunity to make custom cookies especially for her. I need to decide on a theme and she inspires me to make it Chanel.

My idea is to make edible bracelets and charms. Alright, I will also throw in a 1:4 WOC cookie, as I am always looking for ways to apply and learn new techniques whenever I plan for my next set of cookies. After some fun on making my own custom cutters from the previous baby set, this time I get to practice on how to pipe quilted patterns, piping chains and applying pearl dust. I learnt these techniques from another very talented cookie artist called SweetAmbs.

The basics of this set...


Which soon turned not so simple anymore. It took me forever to add the hoops onto the 'charms'!

Every girl wants a piece of me!

Trying different ways to package...


Personally, I think they look gorgeous. It's amazing how such simple shapes and colours can create such elegant theme. In fact, a common feedback I am getting lately is that they are too pretty to be eaten! Anyway, I hope someday I get to make these for you too!


Thursday, 20 March 2014

3D duck cookies

This was part of the baby set cookies and I absolutely adore 3D cookies. I am sure I will be making a whole lot more 3D cookies in the near future.

Inspired by Sugarbelle

They also make beautiful decorations to a plain cake and best of all, you get to customise your own cake!


Tuesday, 18 March 2014

Baby cookies

Custom Handmade Baby Cookies is my third set of cookies. This time, I am trying my hands on making my own cutter. (More on that below.)

Looks like I am getting very serious because these photos were taken with a DSLR camera (it was gathering dust), complete with gift-wrap paper as backgrounds. With my limited DSLR skill, I am proud of how beautiful these photos turned out. Anyone interested to take professional photos of my custom cookies? Hmm, doesn't sound very exciting does it. Anyway, I sure am excited about this set of cookies because they represent my younger daughter's first year. I made this to celebrate her Birthday in early March. And I think they are also great in the occasion of baby shower, Christening, baby's full moon (滿月曲奇) and baby's 100th day celebrations (百日宴曲奇).

Below is the baby girl cookie set with my daughter's favourite teether Sophie the Giraffe, her snuggle comforter (Nature's Purest bear), an owl hair clip I made her a month before she was born, her cute little newborn feet that is the size of this baby shoe and the essential bib. How big is Sophie the Giraffe? It's 1:1! I think you can't find it anywhere in the world? At least I didn't come across it during any of my research.

1:1 Sophie the Giraffe cookie

To see the comparison, please visit my Facebook page.

I put together a baby boy set. The major difference is in the colour theme.


I really enjoyed making these because they are O So Cute!


I had also drafted more animal prints that are possible to pipe small:- ladybug, owl (I looove owls), whale, bird, duck, cow, sheep, giraffe, hippo, Mickey Mouse shadow, Batman, Elmo, Cookie Monster, cupcake, ice cream...

I did make a girl onesie but I accidently dropped it on the floor and it fell royal icing face down, that moment, my heart stopped beating for a second before I slowly picked it up and turned to see the half dried icing was smooshed... I took a deep breath, accidents happens and I am sure this won't be the first time I mishandle my cookies, so let's move on and make sure I make extras next time, yay!

Baby shoes look gorgeous with adding a simple ribbon bow. If I get requested, I would add the word 'Dior' on one of them too. :)


How I did it:
I got a picture of Sophie the Giraffe off the internet and adjust it to the size I wanted and trace it on to a piece of paper. Then outline the giraffe with smooth edges so it's easier to cut around on the dough, trace the outline onto a thick plastic sheet (I used a clear projector sheet), put it on the dough and cut the edge with a small sharp and pointy knife.
I used the same egg cutter for the bib and the owl.
I used a full body bear cutter for the teddy bear and cut it in half, trimming here an there to fit more perfectly onto the imagine of the bear.


Sunday, 16 March 2014

Valentine's Day Cookies

I am taking every Special Day opportunities to make cookies and February has one of the biggest day for cookie decorators - Valentine's Day! There are soo many beautiful designs on the web and it's hard deciding which ones I really like to make (too many!!!) and practice on the different techniques.

Here is my second set of decorated cookies. Enjoy~

From these...
Inspired by Sugarbelle

To this...

And more...
Inspired by Sugarbelle

And more...

And all wrapped to go...

The Keroppi and Rilakkuma cookies were custom made for my daughter's favourite teachers.

I didn't stop here... I was already designing Valentine's Day cookie for next year, and I have nailed down my final designs, my very own design that belongs to ME. Can't wait to show the world!!!

How I did it:
As a full time mum of 2 young kids, I am lucky if I can find straight hours of uninterrupted cookie time, hence I am not able to document step by step my cookie making process with photos. But if you are dedicated in making fancy cookies like me, I strongly recommend you to go through Sugarbelle's website where you can find details of all these techniques and more. Here are words summary of the techniques that I've applied in this set of cookies and you are always welcome to leave me questions and comments, I will try my best to respond to you.

Combining two cutters:
The flying heart wings were made by cutting another slightly smaller heart shape in half.
The leaves of the roses were added to raindrop, tomb shape and bell cutters with some minor trimming.

The love birds on the tree branch is a mouth cutter. I tweaked it to make more length.

Draw and then cut the outline of Keroppi and Rilakkuma on a piece of paper, chase the outline onto the cookie with food colouring pen, use a pin to poke the position of the eyes, mouth, nose and ears, and the rest is drawn freehanded before piping.


Chinese New Year Cookies

Ok, this is the real deal. My first set of art cookies which made me feel like I am really stepping into the shoe of a cookie decorator. From designing, which is inspired by my virtual 'mentor' Sugarbelle, to customising the cookie shape, from mixing multiple colours to piping with different techniques, I enjoyed every step of the way.

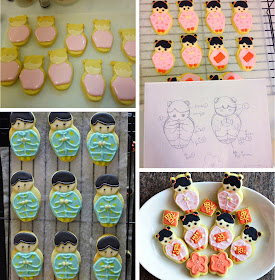
My idea was that the girls are holding a Chinese New Year Candy Box (全盒) and a lucky red banner (揮春) with an upside down chinese character of Luck (福) meaning luck is coming, the plum blossoms give you luck in your love life, aren't Chinese people obsessed with getting lucky... Here I wish everyone good luck and happiness all your life, and most importantly, stay healthy!


I used a matryoshka doll cutter below, and added the little hair buns which were cut using a straw. I love the glossiness of royal icing when it was still wet. The royal icing recipe I use can be found here, it's called the Antonia74 royal icing naming after the creator. It's one of the most popular recipe for homemade royal icing.


These Chinese New Year cookies were made around mid January for my daughter's school CNY party. Later a parent told me she thought that they were store-bought by the school. *smile* My husband also took some to his workplace and I've received some positive comments. He even said his boss's wife is interested to learn from me. How overwhelming!


Baking cookies - getting the recipe right

Here are the photos of our first few times of baking butter cookies. I said 'our' because I did them with my lovely 5 year old. Baking is such a perfect mother-daughter bonding moment.

I think my daughter's creativity sometimes exceeds mine, I particularly like her handbag in the left photo, and chocolate sprinkles as Hello Kitty's whiskers in the right photo. She has such delicate handwork.


Kids love sprinkles... so do I...


Trying my hands on piping for the very first time before my tools arrive (below). I used an Ikea food bag by cutting an extremely tiny hole at the corner. The lace patterns were inspired by Sugarbelle. She is my virtue 'teacher' and I learn nearly everything from her blog, I also use her cookie recipe with all the cookies posted here.


Outling and flooding with proper tools for the first time as they gradually arrived. Mixing and getting the right colours I wanted can be such a challenge, I really need to work on that. I got all my Americolor food colouring gels from Sweet Decorations. Photos of my collection can be found here.


Stained glass cookies

This is the first batch of cookies that I baked. I didn't want to bake plain cookies, but at the time I had only hearts and stars cutters. So I've decided to do stained glass cookies. It was easy enough, I just had to make sure that the lollies dissolved perfectly by stand in front of the oven throughout the whole baking time. I am using FOX'S candies.

A birthday party is held every month at my elder daughter's school, each student is welcomed to bring some snacks to the celebration. This was made in January which is my daughter's birth month. So what better way to celebrate her birthday with all her classmates than to have my handmade cookies.

Here are the pictures of my first batch of cookies... (Excuse the quality as I was only taking photos with my iPhone5 in the beginning.)


I packaged them like this... with my daughter's expert sticker sticking skill...


Later when I went to pick up my daughter from school, one of the parent said they were really yummy. That was so encouraging. :)


Cookie cutters and food colouring

I am now 3 months into my cookie art addiction and finally decided to write a blog documenting my journey under my husband's encouragement.

Like many of my cookie predecessors, I am also addicted to cookie cutters. So far, I've collected just over 200 cutters, these are from all sorts of places:- Taobao(淘寶), eBay, Wilton, City Super, Twinsco(二得惠), Sweet Decorations and Living Plaza by Aeon. But I think I am not going to stop here, I am always on the look out for more unique cutters. How lucky are those cookiers who live in the States to be able to get custom made cutters!


Being a bit of a perfectionist (it's a better word for my OCD/pickiness/artist temperament), I always tweak cutters or trim cookie dough here and there after they have been cut with cookie cutters to make them perfect for me. It is time consuming but I just want my cookies to be as perfect as I can do.

I have these Americolor food colouring gels and pens below. They claim to be the worlds finest food colouring and all the cookie professionals I came across agree that they produce the most vibrant colours with a small amount. The colours I have are super black, super red, tulip red, bright white, lemon yellow, warm brown, royal blue, sky blue, deep pink, leaf green and ivory. They can be purchased from Sweet Decorations. I also have some edible dusts, shown here.


Saturday, 15 March 2014

The Calling...

It all began in Dec 2013 when a friend gave me plain cut-out gingerbread man cookies for Christmas. They were cute and yummy, but something was missing I thought to myself... the eyes, mouth, hands and legs details! How I wanted to add those details to them so that they look like Gingy from Shrek!

So I began researching for Gingy looking cookies and it's the first time in my life (where have I been all these years?) to open up to this world of cookie art! I was hooked ever since. I spent day and night looking at decorated cookies on Pinterest and blogger tutorials (they seem to be all from the States) and YouTube videos, researching cookie recipes and cookie gadgets. I wanted to start ASAP. So I began baking and perfecting my butter cookie recipe while gathering my shopping list from Taobao(淘寶), Twinsco(二得惠) and Sweet Decorations...

Cookie art incorporated so many elements of the things I love in life:- drawing, designing, browsing at beautiful things, being crafty, crunchy butter cookies, chocolate cookies and most of all, I get to spend quality time with my 5 year old who loves to bake, draw and decorate with me!


I have so many ideas and designs lined up already, the creativity in cookie art is literately endless. With 2 youngsters, I just hope that I get time to put them all into practice and create cookies that put a smile on everyone!